
UPDATE: WP Engine’s 1-Click Staging is now considered “legacy” and will ultimately be retired. Check out their new Sites workflow with Staging and Development environments here.
A website dress rehearsal
WordPress is a powerful tool for web developers because it offers so many options for both design and functionality. Once the research has been completed and decisions about the site have been made, updates can be implemented in minutes and all the editing is performed live and in real-time. This benefit also poses a challenge – given the importance of the project, you may not wish to automatically make new content or functionality live without testing, or you might want to get something prepared and scheduled for a set date in the future.
The solution is to work on a staging site; this is an independent clone of your live website and can be easily created to test changes, from providing content for review to the addition of new plugins, themes or custom code. This option may not completely eradicate those ‘first-night nerves’ but can certainly provide extra assurance that the site has been tested thoroughly.
WP Engine includes a staging site with each WordPress installation for all its customers; this not only allows for easy testing but also means that the successful final site can be easily deployed onto the live environment. The staging site can be used as a secure way to thoroughly test your website before it is exposed to your customers, and it even includes the same daily backups as would be provided on a live site. Staging is a valuable step in the website development process and is as simple as selecting the ‘Staging’ tab from the WordPress dashboard and copying your website across. This will create a link that will allow you to access the staging site; be aware that this process will overwrite any previous staging environment. From here, it is possible to edit and develop the staging site in the same way as the live site (administrative rights are copied along with the content).
How To Setup a Staging Area on WordPress
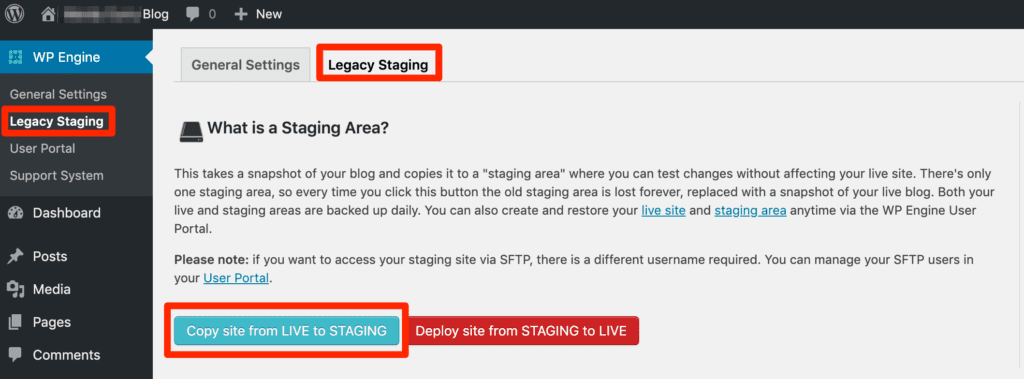
Deploying your live site to WP Engine’s legacy staging environment is very straightforward:
- Login to your WordPress website dashboard at www.yourdomain.com/wp-admin
- Click on the WP Engine tab on top left of the sidebar
- Select Legacy Staging
- Click the blue “Copy site from LIVE to STAGING” button
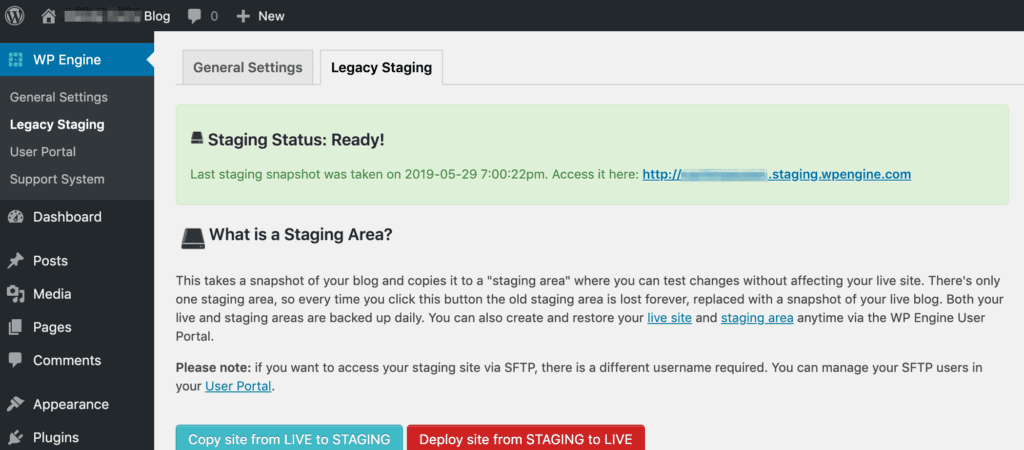
Your site will be copied to the legacy staging area of your website installation and a green box will pop-up showing the status. The larger the size of your live site, the longer it will take to copy over.
When your live site has been copied into the 1-click staging environment, you will see a green banner and be given a link to access it.
‘Alright on the night?
There is no replacement for live testing, but a staging site can mitigate many of the risks of going live without testing. It is the first step in ironing out any major issues with website changes. Do bear in mind, though, that not everything can be tested. For example, there is no server-side caching in place on the WP Engine staging environment, so anything that could conflict with the cache must be tested on the live site as well. Plugins connected to third-party services – for example, functionality that allows visitors to share a page on social media or automated sharing of new content – may also require live testing to ensure that the correct URL’s are being used to share posts.
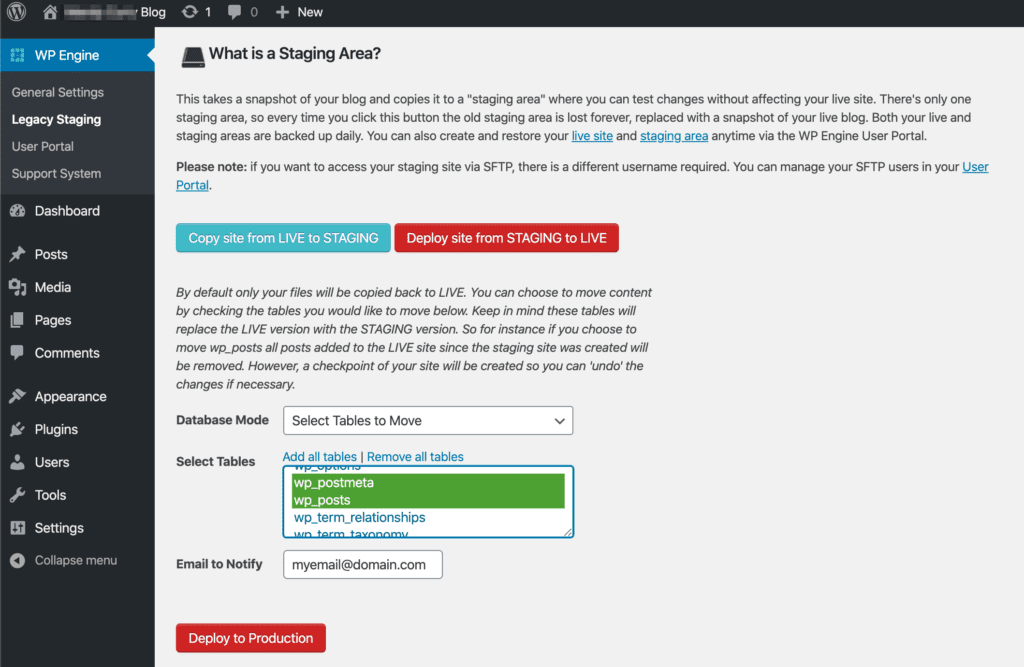
If you’ve made changes to the staging site and want to push those changes to the live site, you can do so easily. Some important information to note about the legacy staging deploy process:
When deploying to live there are 3 database options. Tables cannot be merged, only overwritten.
- Move All Tables — Overwrite all tables on live
- Select Tables to Move — Overwrite specific tables on live
- Move No Tables — Copy no tables to live from staging
To start the deployment to live:
- Login to your live website’s WordPress dashboard at www.yourdomain.com/wp-admin
- Click on the WP Engine tab on top left of the sidebar
- Select Legacy Staging
- Click the red button that says “Deploy site from STAGING to LIVE”
- Select a Database Mode (see above options)
- Click the red button that says “Deploy site”
The main value of a staging site is that it allows you to work out the kinks in any website development prior to going live, and while it may not entirely eliminate those ‘first-night nerves’ it does provide the means to run your website through a dress rehearsal and test new designs, content and functionality before it is presented before your audience.